How many of you have your flimsy center together? I know one or two of you do! I bet you thought I would reveal a flimsy with this post...well as usual things here at the Ranch have been a bit of a challenge. The A/C stopped working right a couple of weeks ago. A repair, then a replacement happened. Cooling bliss...until (duh, duh, duh) Tuesday morning when the main motor blower went out, and of course, that means back to the Stoney Bake! Hopefully, the new motor will arrive this morning and we can get things re-normalized around here. My sewing was very limited the last couple of weeks. Although I love my little sewing corner of the world, dang it gets hot in there! I do have one flimsy all together, and 2 centers finished, but no borders on those yet. Borders? Ms. Crew what should we do for borders? Well, I'm leaving that totally up to you. I usually finish my centers and let the quilt tell me what it wants for borders, if any at all. Please tell me your quilts talk too! (Yes, mine are named too!)
The center section of the quilt top center we made on this journey should be approximately 60-1/2"x60-1/2" before borders. If you add at 2-1/2" stop border with background like I suggested last week, it should be approximately 64-1/2"x64-1/2". If you decide to add a 6" border (trying to keep the Quilty Math simple here) it will end up about 76"x76" ish. If you choose a simple 6" border you will need 6 each 6"xWOF strips, and that will mean about 3 yards of border fabric. Binding (based on 2-1/2" binding would be about 8 strips of 2-1/2"xWOF or about 2/3 yards of binding fabric. It's your quilt, but these are some guidelines. I am sure your local quilt shop would be happy to help you with the Quilty Math. If you want to have a fancier finish to your artwork, that would be great! I cannot emphasize enough that this is YOUR quilt, YOUR creative artwork, you make the ultimate border decisions.
I should have taken a picture of the completed one yesterday outdoors, but with the A/C guy tromping in and out all day, I didn't manage to get it dragged outside and...this morning the heavens opened and provided us with rain and cloudy skies so no picture this morning! That gave me a better idea!
Let's have a Flimsy Parade! No, not a Floozy Parade, although that might make for interesting reading in the local scandal sheet: Headline: Local Floozy Parade Without Permit. Or NewsCenter16: Po'dock, Indiana Floozy Parade Curtailed...film at Eleven.
I'm willing to give you the how to's on making this quilt, but I'm not willing to spend time in the local lock up for you!
So let's keep it simple. Let's post pictures of your creations on Instagram with the hashtag: #StoneysCrewMysteryQuilt2019. Let's get them posted by August 1 and I will pull them together for a post so we can all see each other's fun quilts. No need to have it quilted by then, just a picture of the flimsy is fine. Heaven knows mine won't be quilted by then, and definitely not bound by then!
Now I have been asked to create another one of these adventures...I'm going to have to think about that. The next adventure might be a table runner or topper or something smaller. I will have to get in gear and think one up tho! There maybe an idea or two bouncing around in the caverns of my mind. I will announce when I'm ready to go on that. In the mean time...let's get those flimsy's finished a pictures up on the 'Gram.
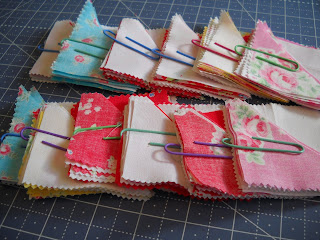
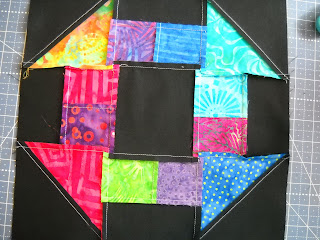
Now while we had the brief respite of working A/C...Bonnie Hunter 2019 Leader & Ender Challenge was posted. I read it, and was listening to a jelly roll project I had started laugh at me from the corner of my sewing room and thought, "Plot Change!" I'm going to do that Stoney's Crew style! I got 15 of these cute little blocks sewn while putting together my flimsy centers. I will post about that next week, in the mean time here is a peak into what I am doing for my Leaders and Enders:
and then they became this:
I will say that the whole webbing thing has me totally baffled. Maybe by next week, it will click in my wee little mind. See you then!
7/10/2019
7/03/2019
All Churned Up!
This post won't be long. Things are all askew here at the ranch...so I'll be brief.
This week we are going to make the second block for this quilt. This is what you will need:
Cut 13 each 4-1/2"x4-1/2" squares from your background fabric. While you have your background out, if you are going to put a #1 Stop Border around the center of our quilt, you can cut 7 each 2-1/2" x width of fabric (WOF) for your Stop Border now. (The quantity of stop border is based on 40" fabric.)
Using your 4-1/2"x4-1/2" half square triangle blocks and your sticks and stones in conjunction with your newly cut background fabric squares to make a churn dash:
Sew the blocks together.
And yes, I love me some seam spinning!
Again the upper right and lower left blocks spin clockwise...
and the upper left and lower right spin COUNTER clockwise.and the upper left and lower right spin COUNTER clockwise.
Now if you are chomping at the bit to get this together, here is the order to sew the center of your quilt together:
So what do you have? Any surprises? I'm going to be mean and say, "See you next week!"
Have fun!
This week we are going to make the second block for this quilt. This is what you will need:
Cut 13 each 4-1/2"x4-1/2" squares from your background fabric. While you have your background out, if you are going to put a #1 Stop Border around the center of our quilt, you can cut 7 each 2-1/2" x width of fabric (WOF) for your Stop Border now. (The quantity of stop border is based on 40" fabric.)
Using your 4-1/2"x4-1/2" half square triangle blocks and your sticks and stones in conjunction with your newly cut background fabric squares to make a churn dash:
Sew the blocks together.
And yes, I love me some seam spinning!
Again the upper right and lower left blocks spin clockwise...
and the upper left and lower right spin COUNTER clockwise.and the upper left and lower right spin COUNTER clockwise.
Now if you are chomping at the bit to get this together, here is the order to sew the center of your quilt together:
| Row 1 | Churn Dash | Star | Churn Dash | Star | Churn Dash |
| Row 2 | Star | Churn Dash | Star | Churn Dash | Star |
| Row 3 | Churn Dash | Star | Churn Dash | Star | Churn Dash |
| Row 4 | Star | Churn Dash | Star | Churn Dash | Star |
| Row 5 | Churn Dash | Star | Churn Dash | Star | Churn Dash |
So what do you have? Any surprises? I'm going to be mean and say, "See you next week!"
Have fun!
Recap:
Intro Week: Materials Requirements
Week 5: Sticks & Stones (Clue 5)
Week 6: Star Struck (Clue 6)
Subscribe to:
Posts (Atom)


